 🚀")
The installation of cPanel on Linux VPS systems is the best choice for system administrators, developers, and hosting companies who want full control over their servers without performing manual operational tasks. By using a Buy VPS Server or specifically a Buy Linux VPS Hosting plan, users can take full advantage of virtual private server capabilities alongside WHM and cPanel, providing a centralized dashboard to manage domains, emails, databases, and security operations.
This guide provides a complete explanation of system requirements, supported operating systems, command-line installation procedures, security hardening methods, and performance optimization techniques needed to create a production-ready server system from the start.
🧩 What Is cPanel & WHM?
cPanel & WHM is a Linux-based web hosting control panel suite that allows server owners to manage hosting infrastructure through a graphical interface instead of relying entirely on the command line. WHM (Web Host Manager) operates at the administrative level, giving root users the ability to configure server-wide settings, create hosting packages, manage security policies, and allocate resources, while cPanel works at the end-user level, allowing individual account holders to manage domains, email accounts, databases, files, and applications.
The reason it runs on Linux is simple: cPanel is built around the Linux ecosystem, leveraging services like Apache, MySQL/MariaDB, Exim, and system-level package management that are tightly integrated into Linux distributions such as AlmaLinux and Ubuntu. WHM controls the server; cPanel manages individual accounts inside it.
Since cPanel is commercial software, a valid license is required to activate and continue using the service after installation, and the license is tied to your server’s IP address. If you're planning to deploy it, you can buy cPanel VPS to get started quickly with a fully compatible environment.
If you're evaluating control panel options before you install cPanel on Linux VPS, our in-depth comparison of CyberPanel vs cPanel can help you choose the right solution for your hosting strategy.
🖥️ System Requirements to Install cPanel on Linux VPS
You must install cPanel & WHM on a clean server. This is non-negotiable, because any preinstalled services like Apache, MySQL, or control panels can break the installation process when you install cPanel on Linux VPS. Proper resource planning also prevents performance bottlenecks, failed installations, and licensing issues later.
|
Category |
Requirement |
Details |
|
RAM |
Minimum: 2GB / Recommended: 4GB+ |
2GB works for basic testing, but 4GB or higher is strongly recommended for production use |
|
Storage |
Minimum: 20GB SSD |
SSD storage is essential for database performance and faster I/O operations |
|
IP Address |
1 Static IP |
Required for hostname configuration and license activation |
|
Operating Systems |
AlmaLinux 8/9, Rocky Linux 8/9, Ubuntu LTS (supported versions), CentOS 7 (EOL ⚠) |
AlmaLinux is recommended for production; CentOS 7 is deprecated and should not be used for new deployments |
Meeting these requirements ensures a stable foundation before you proceed to install cPanel on Linux VPS.
⚙️ Prepare Your Linux VPS Before Installing cPanel
Before you install cPanel on Linux VPS, the server must be properly configured to prevent service conflicts and installation failures. Most issues during install cPanel on Linux VPS command line happen because the system was not prepared as a clean, production-ready environment.
-
Update the system packages
AlmaLinux / Rocky:dnf update -y -
Ubuntu:
apt update && apt upgrade -y
Keeping the OS updated ensures compatibility with the cPanel installer. -
Set a fully qualified domain name (FQDN)
hostnamectl set-hostname server.yourdomain.com -
Verify it using:
hostname -f
cPanel requires a valid FQDN for proper WHM configuration and licensing. -
Disable NetworkManager (if required on AlmaLinux/Rocky)
systemctl stop NetworkManagersystemctl disable NetworkManager -
This prevents potential networking conflicts during installation.
-
Ensure no Apache or MySQL is preinstalled
Check Apache:systemctl status httpd -
Check MySQL/MariaDB:
mysql --version -
cPanel installs and manages its own services, so preinstalled stacks can break the process.
-
Check SELinux status
sestatus
Confirm its mode and configuration before proceeding, as incorrect SELinux settings can interfere with service initialization.
Once these steps are completed, your server is properly prepared to install cPanel on Linux VPS safely and without avoidable errors.
🚀 How to Install cPanel on Linux VPS (Step-by-Step)
Now that your server is properly prepared, you can install cPanel on Linux VPS using the official command-line installation method. The entire process is performed over SSH and requires root access, so follow each step carefully to avoid configuration errors.
If you are still maintaining legacy infrastructure, you can follow our detailed guide on How To install cPanel on CentOS 7, but migrating to AlmaLinux is strongly recommended for new deployments.
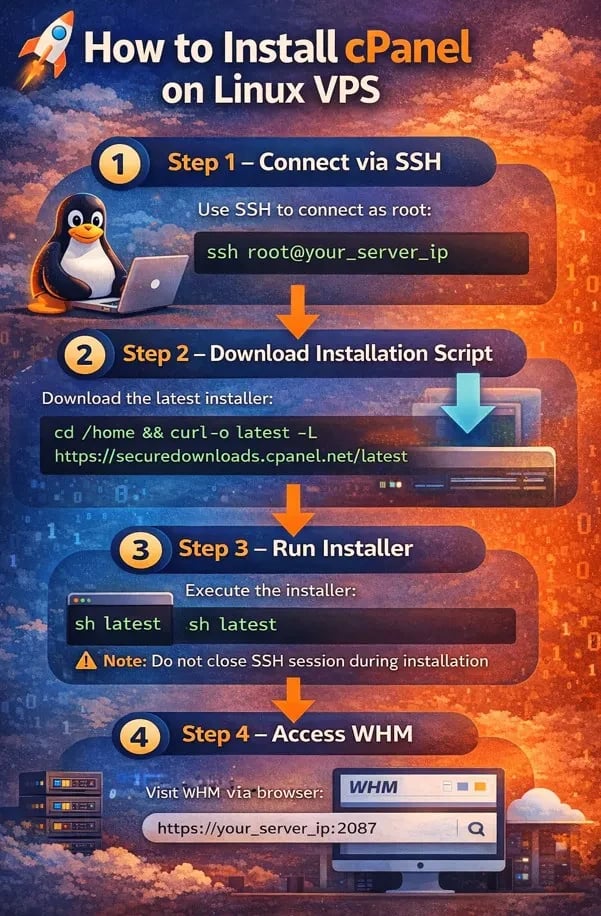
🔐 Step 1 – Connect via SSH
To begin the install cPanel on Linux VPS command line process, connect to your server via SSH as the root user. On macOS or Linux (including Install cPanel on Linux VPS Mac using Terminal), open Terminal and run:ssh root@your_server_ip
On Windows, you can use PowerShell with:ssh root@your_server_ip
or use PuTTY by entering your server IP, selecting SSH, and logging in as root.
📥 Step 2 – Download Installation Script
Once connected, navigate to the home directory and download the official cPanel installer using:cd /home && curl -o latest -L https://securedownloads.cpanel.net/latest
This command fetches the latest verified installer directly from cPanel’s official repository.
⚙️ Step 3 – Run Installer
Start the installation by executing:sh latest
The installation typically takes 30–60 minutes, depending on your VPS performance and network speed; during this time, the installer automatically configures Apache, PHP, Exim, MySQL/MariaDB, and core services, do not close the SSH session or interrupt the process, as stopping it midway can corrupt the setup.
🌐 Step 4 – Access WHM
After installation completes successfully, access WHM through your browser by visiting:
https://your_server_ip:2087
Log in using your root credentials, verify the license, and proceed with the initial WHM setup wizard to finalize your install cPanel on Linux VPS deployment.
🐧 Install cPanel on Ubuntu VPS
Installing cPanel on Ubuntu VPS is possible, but only on officially supported Ubuntu LTS versions listed by cPanel, and compatibility must always be verified before proceeding. You must ensure the system is minimal, updated, and free from preinstalled web stacks, since cPanel manages Apache, MariaDB, Exim, and PHP internally.
Compared to AlmaLinux, Ubuntu support is more recent and slightly more restrictive, which means fewer edge-case guides and less long-term hosting ecosystem familiarity. Ubuntu is generally recommended when your infrastructure already standardizes on Ubuntu servers or when your team has deep Debian-based system experience.
🔎 Install cPanel on Ubuntu
cPanel officially supports specific Ubuntu LTS releases, and attempting installation on unsupported versions will fail dependency checks. Unlike AlmaLinux, which is binary-compatible with RHEL and widely used in hosting environments, Ubuntu may require additional validation for production hosting stacks.
Always confirm RAM (minimum 2GB, recommended 4GB+) and ensure no conflicting packages exist before running the installer. For mission-critical hosting, many providers still prefer AlmaLinux due to its enterprise-grade stability and long-term lifecycle alignment with traditional hosting standards.
⚠️ Install cPanel on Linux VPS CentOS 7 (Is It Still Safe?)
CentOS 7 has officially reached End of Life (EOL), which means it no longer receives security updates from the upstream project, making new deployments risky. While older servers may still run cPanel on CentOS 7, deploying fresh installations on this OS is not recommended due to security exposure and long-term compatibility concerns.
If you are still using CentOS 7, migration to AlmaLinux or Rocky Linux is strongly advised to maintain security patches and official support. AlmaLinux is considered the better alternative because it offers RHEL compatibility, active maintenance, and full cPanel support for production environments.
🔧 Initial WHM Setup Configuration
After you install cPanel on Linux VPS, the first login to WHM triggers the initial configuration wizard that prepares your server for production use. This stage is critical because licensing, DNS configuration, and security settings directly impact server stability and hosting reliability.
-
Verify cPanel License: WHM automatically checks the license tied to your server IP address; if activation fails, you must contact your provider or license vendor before proceeding.
-
Configure Nameservers: Set up authoritative nameservers (e.g., ns1.yourdomain.com and ns2.yourdomain.com) and ensure proper DNS zone configuration to allow hosted domains to resolve correctly.
-
Apply Basic Security Settings: Configure SSH access policies, enable brute-force protection, and adjust service settings to minimize exposure before adding live websites.
-
Create the First cPanel Account: Use WHM to create your first hosting account by assigning a domain, username, package, and resource limits.
-
Set contact email: Define an administrative email address to receive system alerts, resource warnings, and security notifications.
-
Configure packages: Create hosting packages with predefined disk space, bandwidth, email limits, and database allocations for structured account management.
-
Enable backups: Activate automated backups and choose local or remote destinations to protect your server against data loss.
Completing the WHM setup properly ensures your install cPanel on Linux VPS deployment is secure, licensed, and fully ready for hosting websites.
🔐 Security Hardening After Installing cPanel
Once you install cPanel on Linux VPS, securing the server should be your immediate priority to prevent unauthorized access and brute-force attacks. Start by changing the default SSH port, configuring a reliable firewall like CSF (ConfigServer Security & Firewall), enabling automatic system updates, and activating cPHulk to block suspicious login attempts at the WHM level.
You should also configure regular backups and verify restore points, because even a well-secured server must be prepared for unexpected failures or compromises.
⚡ Performance Optimization Tips
After installation, optimizing performance ensures your VPS can handle real traffic without slowdowns or service interruptions. Use SSD-based storage for faster I/O operations, increase PHP memory and execution limits where necessary, enable caching mechanisms such as OPcache or LiteSpeed Cache, and continuously monitor load average through WHM to detect bottlenecks early.
Proper resource planning, choosing the right VPS tier with adequate RAM and CPU cores, prevents performance degradation as your hosted websites grow.
❌ Common Errors When Installing cPanel on Linux VPS
Even when you carefully follow the official procedure to install cPanel on Linux VPS, certain configuration mistakes can cause the installer to fail or WHM to malfunction after setup. Most of these issues are infrastructure-related and can be avoided with proper pre-install validation.
-
Installation fails on low RAM: Servers with only 1GB of RAM or insufficient swap space often crash during installation because cPanel requires at least 2GB, with 4GB recommended for stability.
-
Hostname not FQDN: If the hostname is not set as a fully qualified domain name (e.g., server.domain.com), the installer will throw validation errors, and WHM services may not initialize correctly.
-
Port blocked (2087 / 2083): If firewall rules block required ports such as 2087 (WHM) or 2083 (cPanel), you won’t be able to access the interface after installation.
-
DNS misconfiguration: Incorrect nameserver setup or missing A records for the hostname can lead to resolution errors and SSL warnings in WHM.
-
License activation error: Since the license is tied to the server IP address, using an unlicensed IP or changing the IP after activation can trigger licensing failures.
By verifying resources, hostname configuration, firewall rules, DNS records, and license status beforehand, you significantly reduce installation errors and ensure a smooth install cPanel on Linux VPS.
📊 Comparison Table: Ubuntu vs AlmaLinux for cPanel
Selecting the correct operating system is essential before installing cPanel on a Linux VPS, as OS compatibility affects stability, security updates, and long-term support. Although Ubuntu and AlmaLinux both support cPanel on approved versions, AlmaLinux remains the preferred choice in traditional hosting environments.
|
Feature |
Ubuntu |
AlmaLinux |
|
Official Support |
Limited (specific LTS versions only) |
Full |
|
Stability |
High |
Very High |
|
Recommended for Production |
Use with validation |
Strongly Recommended |
|
Community Adoption in Hosting |
Growing |
Strong |
|
Enterprise Alignment (RHEL-based) |
No |
Yes |
|
Long-Term Hosting Ecosystem Compatibility |
Moderate |
Excellent |
For users exploring lighter or open-source control panels, reviewing the available cPanel alternatives may provide cost-effective or performance-focused options.
Conclusion
Linux VPS systems enable complete administrator access and flexible hosting options with their cPanel installation, which provides WHM and cPanel as professional management tools. The installation process becomes easy when you create a clean server environment, meet the system requirements, select an AlmaLinux operating system, and execute the official command-line installation steps.
Your VPS system becomes a reliable hosting solution for websites, email services, and business applications when you implement proper security measures, performance enhancements, and verify software licenses.


 🔐")
![What Is Cold Data Storage? ❄️ [2026 Guide]](https://1gbits.com/cdn-cgi/image//https://s3.1gbits.com/blog/2026/02/what-is-cold-data-storage-750xAuto.webp "What Is Cold Data Storage? ❄️ [2026 Guide]")
![What Is Virtual Desktop Infrastructure? 🖥️ [VDI Explained]](https://1gbits.com/cdn-cgi/image//https://s3.1gbits.com/blog/2026/02/what-is-virtual-desktop-infrastructure-vdi-750xAuto.webp "What Is Virtual Desktop Infrastructure? 🖥️ [VDI Explained]")


