
Disabling Windows Defender can be a necessity for various reasons, but it's akin to walking a tightrope between freedom and vulnerability. Knowing how to disable Windows Defender on Windows 7 or Windows 11 is akin to wielding a double-edged sword. While it's essential to learn how to disable Windows Defender temporarily for specific tasks, such as installing certain programs or troubleshooting, the process involves critical steps that can impact your system's security.
In Windows 10, mastering how disable Windows Defender involves a dance through settings and policies. Disabling Windows Defender in Windows 10 requires navigating through layers of security to access its core, where you can temporarily halt its vigilant watch over your system. However, to permanently disable Windows Defender 10, you delve deeper, altering policies within the Group Policy Editor or Registry Editor—powerful maneuvers that demand caution.
Windows 11, the newer sibling of Windows 10, follows a somewhat similar path in disabling Windows Defender. The steps to disable Windows Defender Windows 11 mirror its predecessor, yet the interface nuances and pathways bear subtle differences. From toggling real-time protection settings to modifying registry values, the essence of how to disable Windows Defender remains a strategic quest in Windows 11.
The crux of the matter lies in understanding that disabling Windows Defender isn't merely about knowing how to disable Windows Defender Windows 10 or Windows 11. It's about discerning when and why to use this knowledge. The decision to permanently disable Windows Defender should be approached with extreme caution, akin to handling delicate machinery—always considering the trade-offs between security and functionality.
Mastering how to disable windows defender windows 7 or Windows 11 permanently involves more than technical know-how; it necessitates a mindful approach to safeguarding your system against potential threats while achieving specific tasks.
Hence, while the steps to disable Windows Defender in Windows 10 disable Windows Defender or Windows 11 can be learned, the wisdom lies in knowing when it's necessary, and how to tread carefully in the realm of system security.
What is Windows Defender?
Windows Defender stands as the vigilant guardian within the Windows ecosystem, a stalwart shield against digital invaders seeking to breach your system's sanctity. It's the native antivirus software embedded within Windows, designed to ward off malware, viruses, and other cyber threats, prowling your digital realm with unwavering watchfulness.
Understanding what Windows Defender is extends beyond its role as a mere antivirus—it's a fortress defending your digital citadel. Yet, there are moments when users seek to disable Windows Defender, contemplating how to disable Windows Defender permanently.
In Windows 10, disabling Windows Defender involves a strategic journey through settings and policies. The quest to permanently disable Windows Defender in Windows 10 necessitates delving into the realm of Group Policy Editor or Registry Editor, invoking powerful changes that should be approached with utmost caution.
Windows 11, the evolved iteration, mirrors this narrative, demanding a similar procession through settings, with the added complexity of navigating its updated interface. The steps to disable Windows Defender in Windows 11 parallel its predecessor, culminating in a cautious approach how to permanently disable Windows Defender Windows 10 or Windows 11, contemplating the ramifications of such actions.
Yet, the beauty of Windows Defender lies not just in its protective prowess, but in the duality it embodies—the need for its steadfast defense while occasionally requiring disablement for specific tasks. Knowing how to permanently disable Windows Defender becomes a skill, akin to a graceful dance between security and functionality.
The crux lies in recognizing the balance—knowing how to disable Windows Defender Windows 11 or Windows 10 permanently, yet comprehending the weight of such decisions. The wisdom in disabling Windows Defender isn't merely in the technicality but in the judicious application of this knowledge, ensuring your system's security without compromising its operational fluidity.
So, while the tale of Windows Defender involves understanding its essence and navigating its settings, the wisdom lies in knowing when to engage its defenses and when to cautiously wield the knowledge of how to disable Windows Defender in Windows 10 permanently or Windows 11. In this dance between security and functionality, the true mastery is in balancing the two, safeguarding your digital kingdom without sacrificing its usability.
Reasons to disable Windows Defender
If it finds something questionable, this antivirus will frequently stop you from installing software a less well-known developer created. Those who use reliable third-party apps can find this annoying. For example, specialized software you use for work doesn't endanger your machine, yet the antivirus will continue to raise the warning.
Even though Windows Defender is one of the greatest antivirus solutions for Microsoft's OS, you can have other reasons to temporarily or permanently disable it. For instance, the program may strain the system resources of low-end PCs.
It could be a good idea to disable Windows Defender if your device is not at risk of being infected with malware. However, we take extra precautions and keep backup anti-malware software on hand.
| Advantages | Disadvantages |
|---|---|
| Reduced system resource usage | Increased risk of malware |
| Compatibility with third-party tools | No real-time protection |
| Avoid false positives | Potential system instability |
If you already use another developer's antivirus program, you may not need Windows Defender. As these programs typically function better than Microsoft's native ones, it doesn't happen often. This article will lead you through the many techniques to temporarily or permanently disable Windows Defender on Windows 10.
How to Disable Windows Defender (Temporarily)?
Disabling Windows Defender temporarily is akin to granting your system a momentary reprieve—a brief hiatus from its constant vigilance over your digital perimeter. It involves a delicate maneuver, navigating through your system's security settings to allow specific tasks or installations without the interference of active protection.
|
Method |
Permanence |
Complexity |
Windows Version |
Requires Admin Rights |
Notes |
|
Group Policy Editor |
Permanent |
Medium |
10, 11 |
Yes |
Effective for Pro editions |
|
Registry Editor |
Permanent |
High |
7, 10, 11 |
Yes |
Risky if done incorrectly |
|
PowerShell Command |
Temporary |
Low |
10, 11 |
Yes |
Quick method for temporary disablement |
|
Windows Security App |
Temporary |
Low |
10, 11 |
No |
User-friendly interface |
|
Services.msc |
Permanent |
Medium |
7, 10, 11 |
Yes |
Disables related services |
Disable windows defender in windows 7 requires delving into system settings tailored to its older architecture. Users navigate these settings, seeking options to temporarily disable Windows Defender, often to integrate alternative security tools or perform specific tasks requiring unrestricted access.
For Windows 10 users, a blend of interface navigation and PowerShell commands grants the ability to temporarily suspend Windows Defender. However, for those seeking a more permanent solution, there's the option to permanently disable Windows Defender in Windows 10 by navigating through settings or employing PowerShell commands to enact enduring changes.
The advent of Windows 11 introduces an updated interface while retaining the need for temporary disablement. Though the steps to temporarily disable Windows Defender in Windows 11 echo its predecessors, they are customized to align with the evolved ecosystem.
Disabling Windows Defender also intersects with Group Policy, offering a sophisticated approach to temporary disablement. Through group policy disable windows defender configurations, users can orchestrate directives that tailor disable windows defender by group policy without permanently altering its fundamental setup.
PowerShell emerges as a potent tool in this symphony of settings, providing users with precise commands to momentarily disable Windows Defender. This agility allows for swift execution of specific tasks or system operations, circumventing active security measures temporarily.
However, the art of temporarily disabling Windows Defender transcends technicality—it's about understanding the need for such actions and their implications. It's about striking a balance between security and functionality, ensuring your system remains safeguarded while accommodating specific tasks.
Therefore, while mastering the steps to temporarily disable Windows Defender across Windows versions is essential, true mastery lies in navigating this balance. It's about safeguarding your digital realm while acknowledging its evolving demands, maintaining security without impeding your system's fluid functionality.
Turn off windows defender windows 11
Disabling Windows Defender in Windows 11 involves several methods, each with its own steps. Here's a detailed explanation using the phrase "disable Windows Defender" multiple times:
Group Policy Method to Disable Windows Defender
To disable Windows Defender via Group Policy in Windows 11
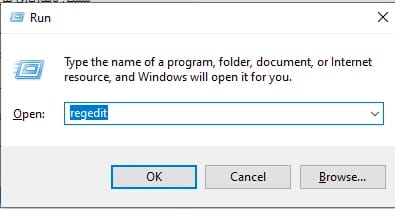
Press Windows Key + R to open the Run dialog box.
Type gpedit.msc and hit Enter to open the Local Group Policy Editor.
Navigate through Computer Configuration -> Administrative Templates -> Windows Components -> Windows Defender Antivirus.
Double-click on the Turn off Windows Defender Antivirus policy.
Select the Enabled option to disable Windows Defender.
Click OK to save the changes.
Registry Editor Method to Disable Windows Defender
Another way is through the Registry Editor:
Press Windows Key + R to open the Run dialog box.
Type regedit and press Enter to open the Registry Editor.
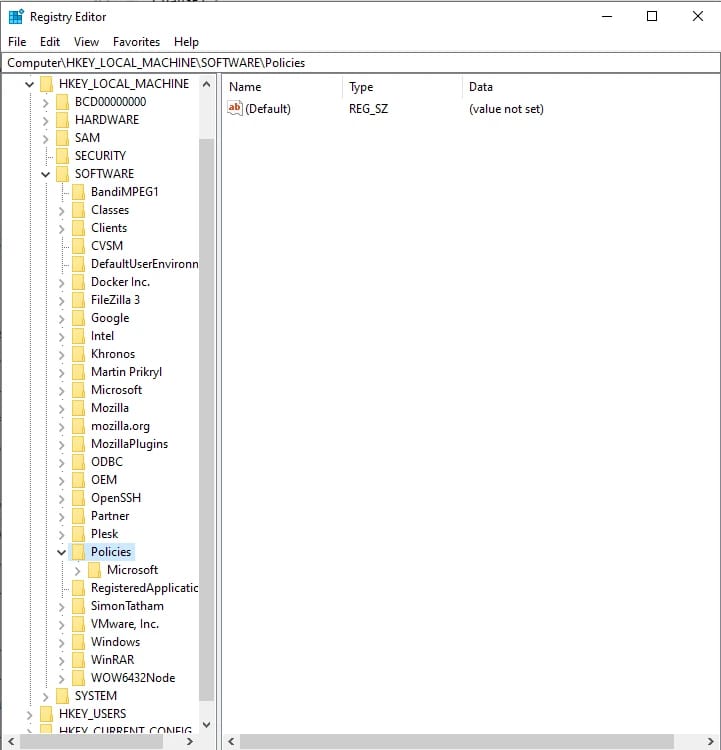
Navigate to HKEY_LOCAL_MACHINE\SOFTWARE\Policies\Microsoft\Windows Defender.
Create a Windows Defender key if it doesn't exist by right-clicking on Microsoft and selecting New -> Key.
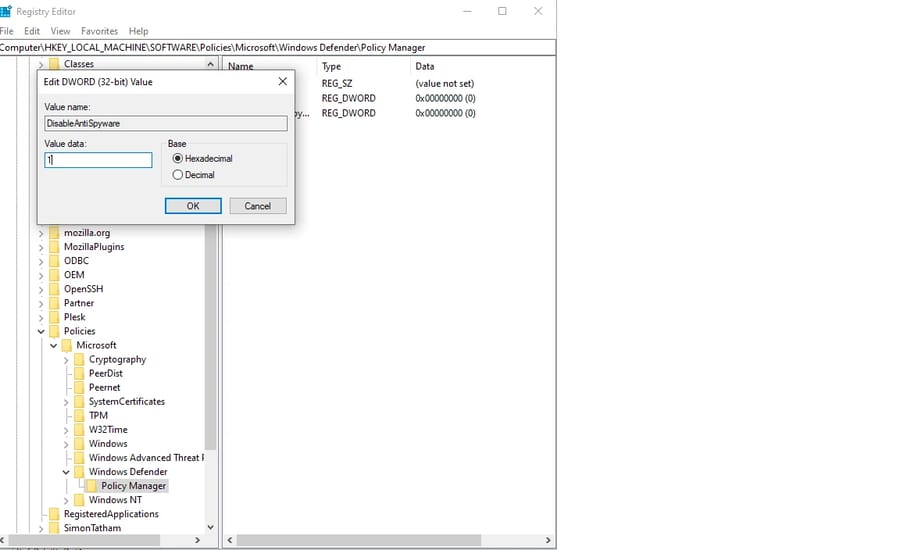
Inside the Windows Defender key, create a DWORD value named DisableAntiSpyware.
Double-click on DisableAntiSpyware and set its value to 1 to disable Windows Defender.

PowerShell Method to Disable Windows Defender
Using PowerShell, you can also disable Windows Defender:
Open PowerShell as an administrator.
Execute the command Set-MpPreference -DisableRealtimeMonitoring $true to disable real-time monitoring.
Security Center Service Method to Disable Windows Defender:
Another way involves stopping the Security Center service:
Press Windows Key + R to open the Run dialog box.
Type services.msc and press Enter.
Locate the Security Center service.
Right-click on it, select Properties, and change the Startup type to Disabled.
Windows Security App Method to Disable Windows Defender
Open the Windows Security app.
Go to Virus & threat protection.
Click on Manage settings.
Toggle off Real-time protection to temporarily disable it.
Remember, while these methods can disable Windows Defender, it's crucial to have an alternative antivirus solution to keep your system protected against threats.
Turn off windows defender windows 10
let's delve into the detailed steps to turn off or disable Windows Defender in Windows 11. Keep in mind that disabling Windows Defender can leave your system vulnerable to threats, so it's recommended to have an alternative antivirus solution in place if you choose to proceed.

Group Policy Method
To use Group Policy to disable Windows Defender:
Press Windows Key + R to open the Run dialog.
Type gpedit.msc and press Enter to open the Local Group Policy Editor.
Navigate to Computer Configuration -> Administrative Templates -> Windows Components -> Windows Defender Antivirus.
Double-click on Turn off Windows Defender Antivirus.
Select the Enabled option to disable Windows Defender.
Click OK to apply the changes.
Registry Editor Method:
Using the Registry Editor to disable Windows Defender:
Press Windows Key + R to open the Run dialog.
Type regedit and press Enter to open the Registry Editor.
Navigate to HKEY_LOCAL_MACHINE\SOFTWARE\Policies\Microsoft\Windows Defender (if the key doesn't exist, create it).
Create a new DWORD value named DisableAntiSpyware.
Double-click on DisableAntiSpyware and set its value to 1.
Click OK to save the changes.
PowerShell Method:
Using PowerShell to disable Windows Defender:
Open PowerShell as an administrator.
Execute the command: Set-MpPreference -DisableRealtimeMonitoring $true.
Services Method:
Disabling Windows Defender via Services:
Press Windows Key + R to open the Run dialog.
Type services.msc and press Enter.
Locate Windows Defender Antivirus Service.
Double-click it, set the Startup type to Disabled, and click OK.
Windows Security App Method:
Using the Windows Security app to disable Windows Defender:
Open the Windows Security app.
Go to Virus & threat protection.
Click on Manage settings.
Toggle off Real-time protection to temporarily disable it.
Remember, after disabling Windows Defender using any of these methods, your system might be more vulnerable to malware and other security threats. It's highly advisable to have a robust antivirus solution installed and updated regularly to ensure your system's safety.
How to turn off antivirus windows 10
turning off Windows Defender (or any antivirus software) in Windows 10 can leave your system vulnerable, so it's essential to have an alternative antivirus solution if you decide to proceed. Here are several methods to disable Windows Defender in Windows 10:
Group Policy Method:
Press Windows Key + R to open the Run dialog.
Type gpedit.msc and hit Enter to open the Local Group Policy Editor.
Navigate to Computer Configuration -> Administrative Templates -> Windows Components -> Windows Defender Antivirus.
Double-click on Turn off Windows Defender Antivirus.
Select Enabled to disable Windows Defender.
Click OK to confirm the changes.
Registry Editor Method:
Press Windows Key + R to open the Run dialog.
Type regedit and press Enter to open the Registry Editor.
Navigate to HKEY_LOCAL_MACHINE\SOFTWARE\Policies\Microsoft\Windows Defender (if the key doesn't exist, create it).
Create a new DWORD value named DisableAntiSpyware.
Double-click on DisableAntiSpyware and set its value to 1.
Click OK to save the changes.
PowerShell Method:
Open PowerShell as an administrator.
Execute the command: Set-MpPreference -DisableRealtimeMonitoring $true.
Services Method:
Press Windows Key + R to open the Run dialog.
Type services.msc and press Enter.
Locate Windows Defender Antivirus Service.
Double-click it, set the Startup type to Disabled, and click OK.
Security Center Service Method:
Press Windows Key + R to open the Run dialog.
Type services.msc and press Enter.
Find Security Center.
Right-click, select Properties, set the Startup type to Disabled, and click OK.
Windows Security App Method:
Open the Windows Security app.
Go to Virus & threat protection.
Click on Manage settings.
Toggle off Real-time protection to temporarily disable it.
Remember, turning off Windows Defender or any antivirus protection can expose your system to potential security risks. It's advisable to only disable it temporarily and have another robust antivirus program installed and updated regularly.
Turn off windows defender windows 7
In Windows 7, Windows Defender is an anti-malware tool and does not include an antivirus component. However, if you wish to turn off Windows Defender in Windows 7, here are some steps:
Using Windows Defender Interface
Click on the Start button, type "defender" in the search box, and select "Windows Defender" from the search results.
In the Windows Defender window, go to the "Tools" tab.
Click on "Options" and then select "Administrator" from the left-hand pane.
Uncheck the checkbox that says "Use this program" to turn off Windows Defender.
Click on "Save" to apply the changes.
Group Policy Method
Press Windows Key + R to open the Run dialog box.
Type gpedit.msc and press Enter to open the Group Policy Editor.
Navigate to Computer Configuration -> Administrative Templates -> Windows Components -> Windows Defender.
Double-click on the policy named "Turn off Windows Defender".
Select the "Enabled" option to disable Windows Defender.
Click OK to confirm and apply the changes.
Registry Editor Method
Press Windows Key + R to open the Run dialog.
Type regedit and press Enter to open the Registry Editor.
Navigate to HKEY_LOCAL_MACHINE\SOFTWARE\Policies\Microsoft\Windows Defender (create the key if it doesn’t exist).
Look for or create a DWORD value named DisableAntiSpyware.
Set the value of DisableAntiSpyware to 1 to disable Windows Defender.
Close the Registry Editor.
Command Prompt Method
Open Command Prompt as an administrator.
Type sc stop WinDefend and press Enter to stop the Windows Defender service.
Type sc config WinDefend start= disabled and press Enter to set the startup type to disabled for Windows Defender service.
Using Security Center Service
Press Windows Key + R to open the Run dialog.
Type services.msc and press Enter.
Locate Security Center (now known as "Security and Maintenance").
Right-click on it, select Properties.
Set the Startup type to Disabled and click OK.
Windows Features Method:
Go to Control Panel > Programs > Programs and Features.
Click on "Turn Windows features on or off".
Uncheck "Windows Defender" from the list and click OK.
Remember, disabling Windows Defender in Windows 7 might leave your system vulnerable to malware and other threats. Consider using another reputable antivirus solution and keeping it updated regularly to maintain system security.
How to turn off windows security
In Windows 10, the Windows Security app encompasses various security features, including Windows Defender Antivirus. Disabling Windows Security components can be done through different methods:
Using Windows Security App:
a. Open the Windows Security app. You can do this by searching for "Windows Security" in the Start menu or by clicking on the shield icon in the system tray.
b. Go to Virus & threat protection.
c. Click on Manage settings.
d. Toggle off Real-time protection to temporarily disable Windows Defender's real-time scanning.
Group Policy Method:
Press Windows Key + R to open the Run dialog.
Type gpedit.msc and press Enter to open the Local Group Policy Editor.
Navigate to Computer Configuration -> Administrative Templates -> Windows Components -> Windows Security.
Double-click on the policy named "Turn off Windows Security Center".
Select the "Enabled" option to disable Windows Security.
Click OK to apply the changes.
Registry Editor Method:
Press Windows Key + R to open the Run dialog.
Type regedit and press Enter to open the Registry Editor.
Navigate to HKEY_LOCAL_MACHINE\SOFTWARE\Policies\Microsoft\Windows Defender Security Center (create the key if it doesn’t exist).
Create a DWORD value named DisableAntiSpyware.
Double-click on DisableAntiSpyware and set its value to 1.
Click OK to save the changes.
PowerShell Method
Open PowerShell as an administrator.
Run the command: Set-MpPreference -DisableRealtimeMonitoring $true to disable real-time monitoring.
Services Method:
Press Windows Key + R to open the Run dialog.
Type services.msc and press Enter.
Locate Windows Defender Security Center Service.
Double-click it, set the Startup type to Disabled, and click OK.
Windows Features Method:
Go to Control Panel > Programs > Programs and Features.
Click on "Turn Windows features on or off".
Uncheck "Windows Defender Security Center" from the list and click OK.
Remember, disabling Windows Security or Windows Defender can potentially leave your system vulnerable to threats. It's essential to have an alternative, reliable antivirus solution installed and updated regularly to ensure your system's security.
Disable windows defender powershell
Disable windows defender powershell involves executing a command that alters specific settings to turn off its real-time monitoring. Here's a detailed explanation:
Open PowerShell as an Administrator:
Right-click on the Start menu and select "Windows PowerShell (Admin)" or "Windows Terminal (Admin)".
If User Account Control prompts for permission, click "Yes" to proceed.
Execute the PowerShell Command:
The command to disable Windows Defender's real-time monitoring is Set-MpPreference -DisableRealtimeMonitoring $true.
This command changes the real-time monitoring setting to "True," effectively turning off the real-time protection feature of Windows Defender.
To execute the command:
Type or paste Set-MpPreference -DisableRealtimeMonitoring $true into the PowerShell window.
Press Enter to execute the command.
After executing the command, Windows Defender's real-time monitoring will be turned off.
Re-enabling Windows Defender via PowerShell:
If you want to re-enable Windows Defender's real-time monitoring, you can use the following command:
Set-MpPreference -DisableRealtimeMonitoring $false
This command changes the real-time monitoring setting back to "False," which re-enables the real-time protection feature of Windows Defender.
Other Methods to Disable Windows Defender
While PowerShell offers a direct command-line method, other techniques, including Group Policy, Registry Editor, Services, and Windows Security App, can also be used to disable windows defender windows 10 permanently.
For instance:
Group Policy Editor: Navigate to Computer Configuration -> Administrative Templates -> Windows Components -> Windows Defender Antivirus and set the policy "Turn off Windows Defender Antivirus" to Enabled.
Registry Editor: Navigate to HKEY_LOCAL_MACHINE\SOFTWARE\Policies\Microsoft\Windows Defender and create or modify a DWORD value named DisableAntiSpyware with a value of 1.
Services: Access the Services application (services.msc), find "Windows Defender Antivirus Service," and set its Startup Type to "Disabled".
Always remember that while disabling Windows Defender may be necessary in certain cases, it can leave your system vulnerable to threats. It's advisable to have an alternative and reliable antivirus solution installed and activated to ensure continuous protection against malware and other security risks.
Disable windows defender registry
disabling Windows Defender via the Registry Editor involves modifying specific registry settings. Here's a step-by-step guide:
Open Registry Editor:
Press Windows Key + R to open the Run dialog.
Type regedit and press Enter to open the Registry Editor.
If prompted by User Account Control, click "Yes" to allow the app to make changes to your device.
Navigate to Windows Defender Key:
In the Registry Editor, navigate to the following path:
HKEY_LOCAL_MACHINE\SOFTWARE\Policies\Microsoft\Windows Defender
If the Windows Defender key doesn't exist, you'll need to create it.
Right-click on Microsoft, go to New, and select Key.
Name the new key Windows Defender.
Create or Modify DWORD Value:
Right-click on the right pane under the Windows Defender key.
Select New and then choose DWORD (32-bit) Value.
Name this DWORD value as DisableAntiSpyware.
Set Value to Disable Windows Defender:
Double-click on DisableAntiSpyware.
In the "Value data" field, enter 1.
Click OK to save the changes.
Restart Your Computer:
To apply the changes, it's recommended to restart your computer.
Re-enabling Windows Defender via Registry:
If you want to re-enable Windows Defender via the Registry Editor, follow these steps:
Open Registry Editor and navigate to HKEY_LOCAL_MACHINE\SOFTWARE\Policies\Microsoft\Windows Defender.
Locate the DisableAntiSpyware DWORD value created earlier.
Double-click on DisableAntiSpyware.
Change the "Value data" to 0 to enable Windows Defender.
Click OK to save the changes.
Remember, altering registry settings can significantly impact your system's functionality. Be cautious and ensure you're modifying the correct keys/values. Additionally, disabling Windows Defender might leave your system vulnerable to threats. It's advisable to have an alternative antivirus solution installed and updated regularly for comprehensive protection.
Concluison
Disabling Windows Defender is a nuanced endeavor, a delicate balance between security measures and specific system requirements. Whether navigating Windows 7, 10, or the evolved ecosystem of Windows 11, the quest to disable Windows Defender temporarily involves understanding your system's intricacies.
In Windows 7, it's about navigating through settings, seeking ways to pause Windows Defender temporarily to accommodate alternative security tools or perform tasks requiring unrestricted access. Windows 10 introduces a blend of interface navigation and PowerShell commands, offering both temporary and permanent solutions to disable Windows Defender based on your needs.
For those seeking more enduring changes, the pathway to permanently disable Windows Defender in Windows 10 involves deeper settings exploration or leveraging PowerShell commands to ensure lasting adjustments. The arrival of Windows 11 echoes the need for temporary disablement, adapting steps to align with its updated ecosystem.
Group Policy configurations offer a sophisticated approach to tailor Windows Defender's actions without fundamentally altering its setup. PowerShell emerges as a potent tool, enabling swift and precise directives to momentarily suspend Windows Defender, facilitating specific tasks or system operations.
However, the art of disabling Windows Defender goes beyond technical prowess—it's about understanding the why and when behind such actions. It's about striking a balance between security measures and your system's functional needs, ensuring protection without hindering seamless operations.
Therefore, while mastering the steps to temporarily disable Windows Defender across Windows versions is essential, true proficiency lies in navigating this balance. Safeguarding your digital realm while adapting to its evolving demands remains key, maintaining security without impeding your system's fluid functionality. Always remember, disabling Windows Defender should be approached cautiously, ensuring that the system's security posture remains intact amidst specific temporary requirements.

Leave A Comment